Tuesday, March 2, 2010
I made French Bread!
Today was a day unlike most early March days in the south--it snowed! In my 53 years of life, I have only experienced snow in March one other time, the blizzard of '93. Today wasn't quite like that day on March 13 seventeen years ago (snowed about 18"), but it was a day to just sit back and chill. Only, I didn't do that, I decided to make French bread! The last time I got the urge to bake in this way was probably about 25 years ago, a time when there wasn't a great French bakery just around the corner. I actually have a real, honest-to-God, professional baguette pan; you can cook six loaves at a time. Got it out, dusted it off (real dusty, but I decided it needed a good washing), lightly oiled two of the "cavities" and waited patiently for the dough to go through its three risings. It doesn't fit into my wall oven! No problem, I have a heavy-duty, cavernous professional range--the door won't open! Since I renovated my kitchen a few years ago, this professional range is only used on the high holy days--Thanksgiving, Christmas, Easter, just a few times a year. But now, the one time I need to use it, it's on the fritz! Heated up the pizza stone instead and cooked the loaves directly on the stone. This is Julia's recipe, so it turned out beautifully. I can't say that it was the most perfect French bread that has ever been baked or even the best I have ever tasted. It was probably a little dense, probably a little too browned, but there is absolutely nothing like bread fresh from the oven. JD and I ate an entire loaf almost before we could get the rest of the food on the table. With butter, with olive oil, it was so good--so much for trying to shed a few pounds this Lent!
Sunday, February 28, 2010
Longings . . .
Warm weather . . . I really am a southerner, too much cold weather this year!
Frisee . . . looks like I'm going to have to grow it myself!
Squash blossoms . . .I haven't had these since Summer, 2008.
Real, honest-to-God summer tomatoes
Frisee . . . looks like I'm going to have to grow it myself!
Squash blossoms . . .I haven't had these since Summer, 2008.
Real, honest-to-God summer tomatoes
Saturday, February 27, 2010
Reminiscing
Tired tonight--but it's my own doing. I'm recovering quite well from my bicycle crash on September 1 and in fact, have been back on the bike for a couple of weeks now. Today, I biked 32 miles, not up to my pre-injury level by a long shot, but showing continued progress. It was hard today, cold, windy and I have the sniffles. And, my bike buddies (not having any pity for my woeful lack of conditioning) pushed me a little harder today in an effort to move me to the next level. Did you know that you can sweat in 40 degree weather? So what a glorious surprise when I returned from my outing, walking into the house--exhausted and practically frozen--to smell the most incredible aroma. JD had made minestrone, that wonderful, earthy italian vegetable soup that has been a mainstay in our cooking repertoire for the entire 32 years of married life. This is another of Marcella Hazan's recipes, one that is incredibly easy to prepare yet provides a complexity of flavor that can impress the most discerning palates, but provides comfort to all who taste.
As southerners often do, I prepared a "pone" of cornbread to round out the meal. Since JD and I are empty nesters now and without the appetites of ravenous adolescents, much of the "pone" of cornbread often goes uneaten. I haven't quite figured out what to do with the leftovers. Sometimes, I'll have a slice the next morning for breakfast, and of course, you can save in the freezer for southern cornbread dressing. We always say we're going to reheat for the next meal, but that never really seems to happen. So, as JD and I were pondering our leftover dilemma, I thought back to the ritual of my parents when faced with leftover cornbread--they had it as dessert! As a child, I thought their concoction was "gross" (that was the word back then), or at best bizzare. Now, I realize it was a real effort to be frugal and mindful of God's bounty. They were exceptionally adept at finding a use for every last morsel of food, leftover or not. I haven't yet reached that point of mindfulness. I've been spoiled, I've never had to scrimp and scrape by. I waste too much food. But, I'm trying to do better. I'm making a real effort to buy only what I intend to cook. So, this time, I'm going to figure out a way to savor every last bite of that delicious cornbread! I still can't do what my parents did--crumbled cornbread, smothered by buttermilk, served in a tall iced-tea glass, eaten with a long, skinny iced-tea spoon.*** (see below) Does anyone still drink buttermik? I only buy it to use in cornbread, or biscuits, or occasionally pancakes, but never to drink! It seems to save forever, so it never goes to waste. How can sour milk go bad? In all seriousness, I cook enough with buttermilk that I don't have to worry about expiration dates (unlike water chestnuts!).
As I've said before, JD and I have been married a long time, and I think we have talked about everything there is to talk about, but every now and then something comes up, some little tidbit of information, that is totally new, something we didn't know about our childhood, our parents, our siblings. As we were talking about the cornbread/buttermilk dessert concoction, JD exclaimed that his parents would have never stooped to the level of eating something so "country". But, in the same breath, he shared that when his father was out of town, his mother (sorry Faye), would eat leftover cornbread with an onion, munching on that strong, white onion as if it were an apple. Cornbread is just too delicious to be discarded, no matter what!
*** I guess I should have used the proper terminology when speaking about that venerable southern drink--it's "ice tea" (not 'iced') or, even more southern "sweettea" (one word). As in "honey, come on in the house and have a glass of "ice tea" or "there's a pitcher of "sweettea" sittin on the kitchen table". Something must have gotten mixed up with my southern genes, because I can't stand "sweettea".
Minestrone, a vegetarian version based on Marcella Hazan's Minestrone Alla Romagnola from the Essentials of Classic Italian Cooking
Uniformly chop vegetables (1/4 to 1/2 inch chop)
1 lb zucchini
1/2 cup e.v.olive oil
3 tablespoon butter
1 cup onion (sliced thinly)
1 cup carrots
1 cup celery
2 cups potatoes (I use yukon gold)
1/2 pound fresh green beans (chopped into 1" pieces)
3 cups shredded Savoy cabbage or regular cabbage
1/2 cup canned cannellini beans or 3/4 cup dried white kidney beans soaked and cooked (or two 15 oz cans)
6 cups vegetable broth
2/3 cups Italian plum tomatoes with juice
1/3 cup grated parmigiano cheese
salt
Optional: 1 crust from a 2lbs parmigiano reggiano cheese
Method
1. heat oil and butter
2. Add onion in pot and cook in medium heat until pale gold in color.
The vegetables are added in sequence, stirred and cooked under low heat for 2-3 mins.
3. Add carrots, stir and cook for 2-3 mins.
4. Add celery, potatoes, green beans, then zucchini (each stirred and cooked for 2-3 mins).
5. Add cabbage and cook for 5-6 mins
6. Add broth , cheese crust(if used), tomatoes & juice and salt. (can season with additional salt later)
7. Cover pot and once it starts to bubble,stir, cover and simmer slowly for 2.5 hrs. Check and stir frequently. Add cannelli beans or kidney beans, stir and simmer for 30 mins.
8. Dilute with homemade broth or water if too dense and season with salt to taste.
9. Remove the cheese crust before turning off heat. Swirl in grated cheese.
The above is for 6-8 servings. This soup tastes even better the
second day. It freezes well.
Sunday, February 14, 2010
Where's the romance?
After almost 32 years of marriage, JD and I have had our fair share of wonderful Valentine's Day romantic dinners. Tonight, there were no candles, no fancy dinners that either of us had slaved for hours to prepare, no mood music--sound incredibly boring? There are always times of the year (mostly spontaneous evenings) where puttin' on the ritz just seems the right thing to do. But, the emphasis here is on spontaneity. I don't need Hallmark, or the Roman Goddess Juno, or anyone else tell me that I need to be romantic tonight. At this stage in our lives, we are probably at the strongest point of our marriage. We've had some turmoil over the past few years with family illness and our young adult children's sturm und drang. But, where many couples' marriages have fallen apart upon becoming empty nesters, JD and I have taken the opportunity to reconnect. We have things to talk about; we laugh, we cry, we get angry, we are joyous. Passion is still there. We are comfortable, open, honest--no need for facades. Mostly we just love each other. As we sit here this evening watching the Olympic games on TV, we take comfort in just being together. I know it's a cliche and sung beautifully by Justin Timberlake and KD Lang recently, but tonight, I say (as Leonard Cohen says) "hallelujah". "Baby I have been here before, I know this room, I've walked this floor. I used to live alone before I knew you."
Today at lunch, I couldn't resist the temptation of oysters at the 5 Seasons Brewery . What could be better than oysters and beer? I have no business admitting this on a veggie blog, but it's my one area of backsliding as a vegetarian. There's just something about these exquisite, quivering, briny bivalve mollusks that reduces my brain to basically a single cell organism (as I pretend they are). Get some damn backbone, will ya? As a result of over-indulging at the midday meal, there was no need for a formal dinner tonight. White bean and roasted tomato bruschetta paired with a fabulous Willamette Valley Pinot Noir was enough to put the romance into any meal!
Oven-dried tomatoes
I love these tomatoes. Incredibly easy to prepare, they put the umph back into out-of-season tomatoes. Such a much more subtle flavor than sun-dried tomatoes. Use in pasta, on bruschetta, or anywhere you would use sun-dried. Delicious.These can be kept for a week in the fridge.
Preheat oven to 250 deg. (F)
Roma tomatoes (plum)
Olive oil
Salt and pepper to taste
minced garlic--go easy here, don't want to overwhelm (optional)
fresh herbs, such as thyme, oregano
Quarter tomatoes, toss lightly with olive oil, salt and pepper, garlic and herbs. Place on baking sheet lined with parchment paper. Roast for several hours (2-5 hours). You want to concentrate the flavor, but not overcook. Low oven temperature practically ensures a perfect product.
Saturday, February 13, 2010
Beans, Greens, and Grains--The Olympic Version
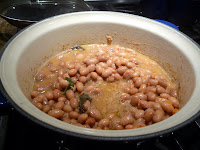
After the past few unsucessful meals, I had the need to cook something comforting and known to me to be good for this evening. For a few days now, I planned to sit back, relax and enjoy the pagentry of the opening ceremonies of the Jeux Olympiques d'hiver in Vancouver and needed a simple unfussy meal that calls for being a couch potato. No potatoes tonight, but I did prepare the most delicious pot of beans I have ever cooked! As JD and I were supping and exclaiming over this pot of beans, you would have thought that we had dined on ambrosia, the food of the gods, or, as in times past, a cassoulet made with duck confit. Only vegetarians could express this kind of emotion over the simplest, most humble of food. My DH even commented that this particular dish could almost be compared to the pommes frites cooked in graisse de canard he enthusiastically and ravenously consumed at a local restaurant just last week (cholesterol be damned!)
A few months back during a trip to San Francisco and the Napa Valley, I found a source for exceptional quality, gourmet, heirloom dried beans, Rancho Gordo (www. ranchogordo.com ). As I try very hard to limit the amount of "faux meat" (boca, tempeh, seitan) in my diet, and not being a huge fan of tofu, I rely heavily on beans and legumes for a legitimate source of protein. One tires quickly of canned black beans and cannellini (and I use these often), so when new tastes come my way, I jump at the chance to experiment. I know it's probably blasphemy to spend this amount of money on dried beans (about $30 for 3-4 lbs), but I have thoroughly enjoyed the complex flavors of these old-variety beans --black beans, white beans, brown-and-white spotted beans, green beans (not haricots verts), and tonight vallarta. I've not used vallarta beans before, in fact before I bought them, I had never heard of them. Dried, they have sort of a light golden champagne color, but when cooked become a deep rich, brown sugar color. The flavor is intense, dense yet with a lightness, nutty, smoky, and chocolatey all at the same time.

Assunta's Beans, from Marcella Cucina
A pound of cranberry beans (I used dried vallarta beans-presoaked overnight), 3 or 4 garlic cloves smashed, 2/3 cup water, 1/3 cup olive oil, 5 or 6 sage leaves, salt and pepper. Put it on the stove, cover very tightly (she recommends a wet dishcloth under the lid, folded back on top of the lid), and cook over the lowest flame your stove will make for an hour and a half (about 3 hours for dried beans). Check every 20-30 minutes to make sure the beans don't go dry. Add small amounts of water as needed (2T or so) The beans absorb the flavor of the sage and garlic, and they are just unbelievably delicious.
A few months back during a trip to San Francisco and the Napa Valley, I found a source for exceptional quality, gourmet, heirloom dried beans, Rancho Gordo (www. ranchogordo.com ). As I try very hard to limit the amount of "faux meat" (boca, tempeh, seitan) in my diet, and not being a huge fan of tofu, I rely heavily on beans and legumes for a legitimate source of protein. One tires quickly of canned black beans and cannellini (and I use these often), so when new tastes come my way, I jump at the chance to experiment. I know it's probably blasphemy to spend this amount of money on dried beans (about $30 for 3-4 lbs), but I have thoroughly enjoyed the complex flavors of these old-variety beans --black beans, white beans, brown-and-white spotted beans, green beans (not haricots verts), and tonight vallarta. I've not used vallarta beans before, in fact before I bought them, I had never heard of them. Dried, they have sort of a light golden champagne color, but when cooked become a deep rich, brown sugar color. The flavor is intense, dense yet with a lightness, nutty, smoky, and chocolatey all at the same time.

My recipe tonight was based on Marcella Hazan's Assunta's Beans, giving reference to an old Italian woman from her young adulthood who prepared beans in a cast-iron pot over an open flame. You have to pamper these beans, drizzling with olive oil, kept at just a bare simmer with the least amount of water to keep from sticking, adding water as the cooking progresses. It's kind of like making an Italian risotto--only over several hours vs. 25 minutes. Marcella and Assunta used fresh beans (cranberry and cannellini, respectively), but since this is winter and the only beans to be had are dried, that's what I used. The published recipe calls only for fesh beans, olive oil, garlic, water, salt and pepper. I modified starting off with a mirepoix, adding the pre-soaked beans, water, a little garlic, olive oil, and a few fresh sage leaves. Per Marcella's instructions, I covered the pot with a damp kitchen towel before adding the pot top. I don't know exactly what this accomplishes, but I would guess to hold in more moisture. It took a few hours to cook, stirring and adding a little water every half hour or so . . .so you need to set aside plenty of time and be willing to fiddle frequently. I've made this recipe twice before, once with dried cannellinis and once with fresh cranberry beans, and they were quite good. However, I think tonight's success was a direct result of the type of bean I used. The Vallarta bean had the body and texture to hold up to hours of cooking without becoming the least bit mushy. Along with these delicious, earthy beans, I served a red-and wild rice pilaf (beautiful colors), and sauteed swiss chard.

The beans, greens, and grains, together, made for a perfectly balanced, complete vegetarian repast. All in all, this was an incredibly satisfying meal, perfectly suited to a lazy, stay-at-home, watch-the-olympics kind of evening. And, I have leftovers!
A pound of cranberry beans (I used dried vallarta beans-presoaked overnight), 3 or 4 garlic cloves smashed, 2/3 cup water, 1/3 cup olive oil, 5 or 6 sage leaves, salt and pepper. Put it on the stove, cover very tightly (she recommends a wet dishcloth under the lid, folded back on top of the lid), and cook over the lowest flame your stove will make for an hour and a half (about 3 hours for dried beans). Check every 20-30 minutes to make sure the beans don't go dry. Add small amounts of water as needed (2T or so) The beans absorb the flavor of the sage and garlic, and they are just unbelievably delicious.
Note: I began with a mirepoix, 2T each chopped onion, celery, and carrot. I sauteed in 1 T butter and 1 T olive oil for 3-4 minutes before I added the beans, garlic, water, remainder of the olive oil, and sage.
Wehani & Wild Rice Pilaf
Serves 4
 Preheat Oven to 350 Degrees
This is a variation on a recipe that I’ve made hundreds of times over the years. It can be changed to a simple French rice pilaf with herbs, a Spanish rice pilaf, one with Indian flavors, etc. The rice and cooking liquid proportions stay the same, vary the ingredients according to the type of food you are cooking. Originally based on Julia Child’s risotto from Mastering the Art of French Cooking, Vol I, I greatly reduced the steps to produce a very simple recipe, ready under 30 minutes. This recipe works every time.
Note: Wild rice or brown rice cooks longer than basmati, jasmine, or regular white rice. Increase cooking time to 45-50 minutes.
Ingredients:
8 oz (or l package) Wehani & Wild Rice (Lundberg)
2-3 Tablespoons finely-chopped yellow onion
1 Tablespoon Butter
1Tablespoon Olive Oil
2 Cups Vegetable Broth (homemade preferably, otherwise use water)
A couple of sprigs of fresh thyme, or 1/2 teaspoon dried
Salt to taste (1 tsp or a couple of grinds of sea salt)
Freshly ground pepper to taste
Rinse rice briefly under running water. Drain. Heat the vegetable broth until simmering in a saucepan. In a 2 quart casserole***, sauté onions in the butter and olive oil until soft, but not browned, approximately 4-5 minutes. Add rice and sauté for a minute or two to infuse flavors. Add the salt and pepper, thyme and the simmering vegetable broth. Give a couple of stirs with a spoon to incorporate ingredients. If the rice mixture doesn’t immediately come to a boil, bring to a low boil. Remove from heat. Cover and place casserole in a preheated 350 degree oven. Cook for 45-50 minutes. Remove from oven. If you are not using immediately, do not uncover and the pilaf will stay warm for half an hour or so.
*** I use Le Creuset enameled cast iron. This pot has to be able to withstand cooking on a stovetop, as well as in the oven.
Wehani & Wild Rice Pilaf
Serves 4

This is a variation on a recipe that I’ve made hundreds of times over the years. It can be changed to a simple French rice pilaf with herbs, a Spanish rice pilaf, one with Indian flavors, etc. The rice and cooking liquid proportions stay the same, vary the ingredients according to the type of food you are cooking. Originally based on Julia Child’s risotto from Mastering the Art of French Cooking, Vol I, I greatly reduced the steps to produce a very simple recipe, ready under 30 minutes. This recipe works every time.
Note: Wild rice or brown rice cooks longer than basmati, jasmine, or regular white rice. Increase cooking time to 45-50 minutes.
Ingredients:
8 oz (or l package) Wehani & Wild Rice (Lundberg)
2-3 Tablespoons finely-chopped yellow onion
1 Tablespoon Butter
1Tablespoon Olive Oil
2 Cups Vegetable Broth (homemade preferably, otherwise use water)
A couple of sprigs of fresh thyme, or 1/2 teaspoon dried
Salt to taste (1 tsp or a couple of grinds of sea salt)
Freshly ground pepper to taste
Rinse rice briefly under running water. Drain. Heat the vegetable broth until simmering in a saucepan. In a 2 quart casserole***, sauté onions in the butter and olive oil until soft, but not browned, approximately 4-5 minutes. Add rice and sauté for a minute or two to infuse flavors. Add the salt and pepper, thyme and the simmering vegetable broth. Give a couple of stirs with a spoon to incorporate ingredients. If the rice mixture doesn’t immediately come to a boil, bring to a low boil. Remove from heat. Cover and place casserole in a preheated 350 degree oven. Cook for 45-50 minutes. Remove from oven. If you are not using immediately, do not uncover and the pilaf will stay warm for half an hour or so.
*** I use Le Creuset enameled cast iron. This pot has to be able to withstand cooking on a stovetop, as well as in the oven.
Wednesday, February 10, 2010
No more Tempeh!
I don't know why I keep doing this, but I decided to cook tempeh again today. If I ever, ever am tempted to tread this way again, perhaps I'll look back at this failed experience, documented in black and white and take a different path. Even the definition--a partially-cooked, fermented soy bean cake--should be a forewarning that this is one of those vegetarian foods that needs to remain in the grocery cooler, not in my fridge. Longing for a traditional Italian Bolognese ragu with pasta this evening, I thought I'll just make it with tempeh!
Everyone knows you should never go to the market when hungry, but yet, I did and ended up with more food than I can possibly cook the next few days and with a package of tempeh. I should have gone with my first inclincation and cook a winter squash ravioli recipe found on another veggie blog--Grapes and Greens. So, I did everything just as Marcella Hazan does in her traditional meat Bolognese, substituting the ground meat with tempeh. I spent quite a bit of time this afternoon with the preparations. I can't even begin to taste this dish, much less eat a whole serving! The tempeh looks at best like ground turkey, at worst like sweetbreads or even brains! My stomach is turning even as I write this. JD says it tastes good, but then he eats offal. I don't know what I'll do with it; JD says he'll eat it later, but then he is always reluctant to eat leftovers. My trying-to-be-frugal heart hurts tonight as I realize this will be one to be discarded. What a waste!
Everyone knows you should never go to the market when hungry, but yet, I did and ended up with more food than I can possibly cook the next few days and with a package of tempeh. I should have gone with my first inclincation and cook a winter squash ravioli recipe found on another veggie blog--Grapes and Greens. So, I did everything just as Marcella Hazan does in her traditional meat Bolognese, substituting the ground meat with tempeh. I spent quite a bit of time this afternoon with the preparations. I can't even begin to taste this dish, much less eat a whole serving! The tempeh looks at best like ground turkey, at worst like sweetbreads or even brains! My stomach is turning even as I write this. JD says it tastes good, but then he eats offal. I don't know what I'll do with it; JD says he'll eat it later, but then he is always reluctant to eat leftovers. My trying-to-be-frugal heart hurts tonight as I realize this will be one to be discarded. What a waste!
Thursday, February 4, 2010
Leave this for the professionals!
OK, over the past couple of weeks, I've started and stopped many posts, had good things to say to start but not able to really bring things to a good conclusion, or able to connect my thoughts to my meal plan for the evening. So, I've left those posts to be edited and re-edited. I really don't know what got into me this evening, but I thought I would prepare Chile Rellenos--not the baked, vaguely Southwesternesque Rachel Ray version, but the honest-to-God, egg-white, then folded-in egg yolk batter version which seems to be de rigeur for any self-respecting "authentic" Mexican restaurant. Last week, when I was in So. Cal for a conference, a friend originally from the SD area took me to one of his favorite Mexican restaurants in the area. Although they are known for the fish tacos, being a veggie, I opted for the chile rellenos. Delicious. Over the years, my forays into Mexican (mainly American-styled Tex-Mex) only yielded, greasy-gross batter laden chiles. Not so here. Fidel's in Solana Beach gave me a taste of airy-light, melt-in-your mouth, queso fresca chiles that one is supposed to only find south of the border. I should have been satisfied. Not so, Chile Rellenos have always intrigued me, so when the deep, dark green, glossy poblano chiles beckoned me from Whole Foods, I couldn't resist. I'm a good cook; I have good skills; I have a specifically-designed copper pot for deep frying. I CAN do this! Charred the chiles--good. Got the skin off, cleaned out the seeds and membranes without destroying the chiles--doubly good. Whisked, by hand the egg white batter--proud of myself. Prepared the filling (spinach and queso fresca)--yummy! But here's where it ends. The whole is not greater than the sum of its parts! I think I used every pot and pan in the kitchen. Overstuffed, and held together--barely--by toothpicks, the chiles were fragile at best. I think while transferring (delicately said, more like tossing) into the hot oil, batter ended up on every vertical and horizontal space. I don't think my kitchen will ever be the same. I'll still be cleaning tomorrow. JD said I should definitely take a picture. NO WAY! I think after this disaster I could potentially qualify for the show "The Worst Cooks in America". Don't get me wrong, it tasted OK, but it was not worth the time, not worth the mess, and definitely not worth the calories. Leave this to the professionals. The only saving grace about this meal was the tomatilla-avocado salsa--a definite keeper. Perhaps a re-do for Super Bowl Sunday!
Tomatilla-Avocado Salsa (Salsa Verde)
4-5 medium tomatillas, dehusked, tossed with olive oil, salt and pepper, roasted for approx 5 minutes (broiler)
juice of one lime
2 T chopped white onion
2 ripe avocados
1 teaspoon cumin
1/2 teaspoon coriander
salt and pepper to taste
cayenne pepper or cholula to taste
Combine in food processor, pulse until coarsely blended. This is more like a tomatilla guacamole, so don't over-process.
Wednesday, January 20, 2010
Hardly Haute Cuisine
It's only Wednesday and already it's been a tough week at work. My job requires that I work with families in crisis, and today was one of those totally gut-wrenching days that makes me wish I had another profession altogether--like bathing cats, or anything! By the time I was able to tear myself away from the seemingly-endless phone conferences, my original plans for dinner were gone with the wind.
So, what next? I refuse to give in to the siren call of fast food. If I'm going to eat something fattening, it might as well have some sort of redeeming value. What's in the pantry? Pasta, pasta, and more pasta--and also quinoa (not tonight), farro (definitely not tonight). What's in the fridge? Well, lots of nice winter veggies, but maybe I can resurrect tonight's best-laid plans for another night. I don't normally use much TVP (textured vegetable protein, AKA fake meat, Boca, Quorn, etc.), but sometimes the need for a quick protein source justifies its use. So, tonight's quick, tasty, more-calories-than-I-need meal came in the form of a vegetarian "Pasticcio", sort of a Greek "beefaroni". Sounds delish, right? Well, it actually was-real comfort food.
As JD and I were talking over dinner, I realized that the first meal I ever cooked for him was a Greek Pasticcio, probably made with ground beef instead of the traditional lamb. I'm not even sure you could get lamb in Birmingham, AL in the '70's. We were teenagers, maybe only 16 or so. I have no idea how it was prepared, only that it was awful! He had absolutely no recollection of the event--so much for fond memories.
I have found that when reduced to the level of using TVP, its flavor and texture can only be improved by including finely chopped mushrooms. Mixed with penne pasta, fire-roasted tomatoes, a reduced-fat bechamel (can that be?), and fresh herbs proved to be satisfying indeed. Recipe to follow, but not tonight!
Sunday, January 17, 2010
Pizza, Pizza!

It's another rainy, dreary day in Atlanta, and, yet again, I find myself longing for the fresh, sun-drenched flavors of summer. Mind you, I have a fridge full of winter veggies--kale, brussels sprouts, delicata squash, shitakes, etc., but I succumbed to the lure of fresh basil in the market. I know it must have come from Argentina or California or somewhere else sunnier than here and I should be roundly chastised for purchasing something that trekked halfway around the world so it could end up satisfying my impulsive craving. Don't even ask about the tomatoes. I did, however, find fresh mozzarella from Alabama, so maybe I can ease up a bit on the self-flagellation.
I love pizza; it is nothing but pure comfort food. From the time I was 7 or 8 and pizza came from a Chef Boyardee pizza kit to the first time I inhaled a Pizza Margherita in Naples, I was smitten. Although I have eaten my fair share of Pizza Americana from the huge chains, once I created a perfect pie (well, maybe) with my own hands, there was no going back. Yes, it takes time and patience. It takes a little hand strength to knead the dough, but that is so meditative. It definitely takes an organized mise en place. But most of all, it takes a quick hand and sheer luck to transfer the beautiful creation from the pizza peel to the oven. Oy veh!
I have no problem admitting that I am a pizza snob. IMHO, simple is best. I don't like sauces on my pizza and I don't like pizza overloaded and soggy with cheese. Yeasty dough brushed with olive oil, sprinkled with parmesan cheese, layered with thinly-sliced fresh tomatoes, bufalo mozzarella, and a chiffonade of basil couldn't be more perfect. Perfetto!
Note: In summertime, I place the pizza stone on the barbeque grill and cook outside. Just make sure that you use indirect heat.
Makes Two, 9 inch pizzas, Serves 2-3
Basic Pizza Dough (recipe follows)
Two tomatoes, thinly sliced
3/4 Cup freshly-grated Parmesan Cheese
6 ounces fresh Mozzarella
Handful of fresh basil leaves, stacked, roll-cut into a chiffonade
Olive Oil, about 1/4 cup, for brushing pizza dough
Basic Pizza Dough
by Charles and Michele Scicolone, Pizza, Any Way You Slice It
Makes one 12 inch pizza or two 9 inch pizza
1 teaspoon active dry yeast
2/3 cup warm water (105° to 115° F)
2 cups unbleached all-purpose flour
1 teaspoon salt
olive oil for the bowl
Sprinkle the yeast over the water.
Let stand 1 minute, or until the yeast is creamy. Stir until the yeast dissolves.
In a large bowl, combine the 2 cups flour and the salt.
Add the yeast mixture and stir until a soft dough forms. Turn the dough out onto a lightly floured surface and knead, adding more flour if necessary, until smooth and elastic, about 10 minutes.
Lightly coat a large bowl with oil. Place the dough in the bowl, turning it to oil the top. Cover with plastic wrap. Place in a warm, draft-free place and let rise until doubled in bulk, about 1 1/2 hours.

Just-kneaded dough

Risen Dough
Flatten the dough with your fist. Cut the dough into 2 pieces and shape the pieces into balls. Flatten the dough slightly. Dust the tops with flour. Place the balls of dough on a floured surface and cover each with plastic wrap, allowing room for the dough to expand. Let rise 60 minutes, or until doubled.

Thirty to sixty minutes before baking the pizzas, place a baking stone or unglazed quarry tiles on a rack in the lowest level of the oven. Turn the oven to the maximum temperature, 500 to 550 degrees F.
With your hands, flatten the dough out on a lightly floured surface. Handling it gently and turning it frequently, pat it into a 12-inch circle (or 9 inch circle, if you're doing two). Dust a pizza peel or baking sheet with more flour.*** Arrange the dough on the peel, reshaping the dough as needed. Shake the peel once or twice to be sure that the dough is not sticking.
***I use just a little corn meal as well. Don't use more than a tablespoon or two, or the crust will become tough.

Work quickly to add ingredients. Brush with a little olive oil. Srinkle parmesan cheese. Layer the tomatoes (5 or 6 slices per pizza should do). Slice the mozzarella thinly and layer over the tomatoes. Sprinkle basil chiffonade. Try not to overload with ingredients. If the pizza dough becomes too heavy,it will be very difficult to slide onto baking stone. Unless you have used quarry tiles to line the oven, you will only be able to make one pizza at a time.


Place the front edge of the peel on the edge of the baking stone farthest from you, jerk it gently to get the pizza moving, then slide the pizza onto the stone.

Bake 6-7 minutes, or until the pizza crust is golden brown and crisp. Slide the peel under the pizza and transfer it to a cutting board. Cut the pizza into slices.
Saturday, January 16, 2010
Longing for a Summer Bounty
January and Black-eyed peas just seem to go together--who could make it through New Year's Day without black-eyed peas and greens? Well, I did this year, but I'm hoping that my neglect of this age-old southern tradition doesn't truly predict the possibility for good luck and financial stability in the coming year.
Even though black-eyed peas are good at any time of the year, there's nothing like freshly-shelled peas from the local market. Don't send 'em cross country to me; I want them out of Farmer Fred's deep-south garden.
As I was preparing black-eyed pea cakes earlier this week, I waxed nostalgic about the few days every summer my mother, sister, and Mrs. Holsomback (our wandering neighbor) sat on the front porch shelling bushels of peas and beans. Mrs. Holsomback provided all of the juicy gossip about the whole neighborhood and as she moved on down the street, I'm sure my dysfunctional family became the focus of that gossip. I hated shelling and "putting up" all those vegetables and found every way possible to get out of the tedious chore. But, as a 7 year old girl, Mrs. Holsomback's independence, her laughter, and her stories enthralled me enough to endure those sweltering afternoons.
Black-eyed Pea Cakes
Tomato Chutney
Baked Sweet Potato "Fries"
Simple Green Salad
Black-eyed Pea Cakes
Recipe by P. Allen Smith
Ingredients
1 small onion, chopped
2 15.5-ounce cans of black-eyed peas, drained and rinsed
1 egg
1/2 teaspoon salt
1 teaspoon hot sauce
1 clove garlic, minced
2 tbsp. all purpose flour
4 ounces of chevre (creamy goat cheese)
1/4 cup fresh parsley, coarsely chopped
2 1/2 cups fresh bread crumbs
1 tbsp. olive oil for sauteing onion
olive oil for cooking cakes
Instructions
To begin, sauté the chopped onion in 1 tablespoon of olive oil until the onion is clear.
While the onions are sautéing, make your breadcrumbs by processing stale bread in a food processor or blender. I like to use day-old French bread. You want the crumbs to be coarse, but not too large.
Combine the sautéed onion, 1 can of the black-eyed peas, egg, salt, garlic, hot sauce, flour , chevre, and parsley in a food processor. Process the ingredients until well combined, but not too smooth.
Scoop the mixture into a large bowl and fold in the other can of peas and 1 cup of breadcrumbs. Stir gently. The mixture will be somewhat sticky.
Form the pea mixture into 3 inch cakes about 1/2-inch thick. The mixture will be somewhat sticky, but if you find that it is too much so just add a few more breadcrumbs.
Dip each cake into the remaining 1 1/2 cups of breadcrumbs, coating both sides. Shake off any excess and place the cake on a baking sheet lined with wax paper.
Once you have made cakes out of all the mixture, cover them and place them in the refrigerator to chill for about half an hour. This step will help the cakes stay together when you cook them.
Heat 3 tablespoons of olive in a skillet over a medium flame. I used a 9 inch skillet. Fit as many of the cakes as you can into the skillet without crowding and cook until golden brown and crispy. This should take about 5 minutes on each side. You really only get one chance to flip these cakes because they are delicate and crumble easily so be sure to allow them to brown thoroughly on each side. Reduce the heat if they brown too quickly. You can add more oil if the skillet becomes dry.
As the cakes finish cooking, place them on a cookie sheet in a slightly warm oven until they are all done and you are ready to serve.
Tomato Chutney-A variation of “Mum’s Tomato Relish”
My husband's grandmother, Feamey or "Mum", made a delicious southern tomato relish every summer. Homegrown, ripe tomatoes are an absolute necessity for the real deal. Not having any fresh ripe tomatoes on hand, I concocted a substitute. It works, but I can't wait til summer to make the proper version.
Two 15 oz cans diced tomatoes, drained
One medium onion, or ½ large onion, very thinly sliced (a mandoline would work well)
½ cup water, or more as needed
1 tablespoon olive oil
1 tablespoon butter
¼ cup sugar ( adjust to taste-there should be a good balance between sweet and sour).
3 Tablespoons Balsamic Vinegar, (or other such as sherry, red-wine)
1 tablespoon Tamarind paste (optional)
1 tablespoon “whole Pickling Spices”, (I like to place them in washed cheesecloth, tied with string for easy removal)
1 ½ teaspoon salt
½ teaspoon red pepper flakes
A few grinds of black pepper
1. Start by caramelizing the onions. Melt butter and olive oil in 2 qt saucepan. Add onions and cook on low heat for approx 15 minutes. Don’t let them brown too quickly. Add a pinch of salt (1/2 tsp), 1 tsp sugar, and a splash of balsamic vinegar. Cook for another 15 minutes until nicely browned.
2. Add tomatoes, pickling spice bouquet, 1 tsp salt, red-pepper flakes, black pepper, and tamarind. Add remaining sugar and vinegar. Add ½ cup water. Stir to combine.
3. Bring to a low simmer, and cook for at least 45 minutes, longer if you have the time. Add more water as needed. The longer the cooking time, the more flavorful the chutney. Especially if you use tamarind paste, you may need to add more sugar, a little at a time, to balance the tartness of the vinegar and tamarind.
4. Serve warm or cold as a condiment for peas (blackeyed, field, crowder, lady peas, etc), lima beans, or anything you think needs a little spice and flavor.
5. Makes about two cups.
6. Keeps for a week in the fridge. Can be preserved. Can be frozen, but not as tasty as fresh or “canned”.
Baked Sweet Potato Fries
Serves two.
Preheat oven to 450 degrees.
One large sweet potato, peeled
2 tablespoons olive oil
Salt to taste (1/2 to ¾ tsp)
1 teaspoon Moroccan Spice Blend (recipe follows)
Freshly ground pepper to taste
1. Cut sweet potato as you would for making French fries—about a ¼ inch.
2. Toss with olive oil, spices, salt and pepper
3. Place on cookie sheet so that the slices are not touching
4. Bake at 450 degrees for 12-15 minutes.
5. Using a spatula, flip to other side (make sure to keep fries separated) and cook for another 10-12 minutes.
Serve immediately, as fries cool quickly.
Moroccan Spice Blend
1 teaspoon ground cumin
1 teaspoon ground ginger
1 teaspoon salt
3/4 teaspoon black pepper
1/2 teaspoon ground cinnamon
1/2 teaspoon ground coriander
1/2 teaspoon cayenne
1/2 teaspoon ground allspice
1/4 teaspoon ground cloves
Mix together in a bowl, save in airtight container and will last as other commercial spices.
Friday, January 15, 2010
Give em the old razzle-dazzle
P & P, or Pomegranate and Perrier. My new favorite everyday, all day, even happy hour drink (when I'm the designated driver). Pom is the most common brand, but it's made from concentrate. Try to get organic, fresh-pressed, 100% juice. It's so good!
The proportions are approx half and half.
Ingredients:
Pomegranate Juice
Perrier, lime flavored (or really any lime-flavored fizzy mineral water)
Fresh lime slice
Fill a lowball or highball glass (depends on how much you want to drink) with ice.
Pour in pomegranate juice to the halfway mark.
Pour in mineral water to top off.
Garnish with fresh lime.
Delicious!
Successful week!
All in all, this week was quite a success! I'm making a real effort to step outside the proverbial box with my dinner menus. I tried new recipes as well as returned to old favorites. I had hoped to write something most every day, but I quickly realized that the blogging process is quite time consuming. Documenting my creations is a work in progress. It's one thing to prepare a meal, but taking those pictures is a totally different matter. And, it has to look like something, someone would actually want to eat!
Early in the week, I found some absolutely beautiful, itty-bitty, baby bok choy at the market. I tried to stick to Thai flavors, but the bok choy called for a simple Chinese-style stir-fry with sesame oil. I ended up with a pan-Asian menu, but I think the flavors worked together nicely.
Thai Lettuce Wraps with Tofu and Mixed Vegetables
Hoisin Dipping Sauce
Stir-fried Baby Bok Choy
Coconut Curry Rice Pilaf
Tofu Lettuce Wraps
Serves two as part of a larger meal.
Six large lettuce leaves (butter or bibb)
½ package extra firm tofu (drained)
½ lb shitake mushrooms (sliced)
1/3 cup coarsely chopped cashew nuts
2 green onions, white plus 2 inches green, chopped
A handful (approx 3 oz) snow pea pods, matchstick julienned
2 large crushed garlic cloves (fresh)
4 coin-sized ginger slices (fresh)
soy sauce
1 Tablespoon butter
Canola oil
salt
pepper
Marinade for Tofu:
1 Tablespoon Hoisin Sauce
1 Tablespoon Soy Sauce
2 tsp Dry Sherry
Pinch of sugar
Pinch of red pepper flakes
Directions:
Wash and dry the lettuce leaves.
Cut the tofu into ¼ inch size squares. Marinate for at least 30 minutes and up to an hour. Spread tofu squares on a non-stick cookie sheet (otherwise use non-stick cooking spray). Bake for 25-30 minutes at 375 degrees. Set aside.
Meanwhile, heat wok or frying pan, add 1 tablespoon canola oil and 1 tablespoon butter, and sauté mushrooms over high heat. As the mushrooms begin to cook, they will express liquid; continue to cook until the liquid is gone and the mushrooms are tender and golden. Set aside.
Heat wok again and add 1 T canola oil. Add garlic and ginger. Press briefly in the oil to add flavor. Add green onions, snow pea pods. Stir fry for about a minute. Add cooked shitake mushrooms, cashew nuts, and tofu. Add a couple of splashes of soy sauce (about 4 or 5 shakes). Alternatively, you could add a little of the tofu marinade or perhaps a “Stir-fry sauce” (such as Kikkoman). Just a tablespoon or two will be plenty. Add salt and pepper to taste. Be careful, as soy sauce and other asian stir fry sauces have a lot of salt. Stir-fry for another minute or two to finish the cooking. Serve immediately with hoisin dipping sauce.
Spoon the mixture into the lettuce leaves and roll them up—messy, but very yummy!!
Hoisin dipping sauce for lettuce rolls: From The Best of Vietnamese and Thai Cooking by Mai Pham
Makes 2 cups (halve recipe for lettuce wraps above)
1 cup Hoisin Sauce
½ Cup Water
¼ Cup Rice Wine Vinegar
1/3 Cup Pureed or Finely Minced Yellow Onion (I used just a couple of Tablespoons of finely chopped)
1 Tablespoon of Ground Chili Paste (easily available at the local market in the Ethnic Foods section)
1 Tablespoon Chopped Roasted Peanuts for Garnish (I omitted these as I used Cashews in the main recipe)
Put first four ingredients into a small saucepan and bring to a boil. Reduce heat and let simmer for 5-7 minutes. Add a little water if too thick. Set aside to cool. Transfer mixture to a sauce dish and garnish with chili paste and chopped peanuts.
Coconut Curry Rice Pilaf
Serves 4
Preheat Oven to 350 Degrees
This is a variation on a recipe that I’ve made hundreds of times over the years. It can be changed to a simple French rice pilaf with herbs, a Spanish rice pilaf, one with Indian flavors, etc. The rice and cooking liquid proportions stay the same, vary the ingredients according to the type of food you are cooking. Originally based on Julia Child’s risotto from Mastering the Art of French Cooking, Vol I, I greatly reduced the steps to produce a very simple recipe, ready under 30 minutes. This recipe works every time.
Ingredients:
2 Cups Basmati Rice (in this recipe you could use Jasmine Rice)
2-3 Tablespoons finely-chopped yellow onion
2 Tablespoons Butter
1 Tablespoon curry powder (use the best brand you can find or make your own)
1 Cup Lite Coconut Milk
1 Cup Vegetable Broth (homemade preferably, otherwise use water)
Salt to taste (1 tsp or a couple of grinds of sea salt)
Freshly ground pepper to taste
Rinse rice briefly under running water. Drain. Heat the coconut milk and vegetable broth until simmering in a saucepan. In a 2 quart casserole***, sauté onions in the butter until soft, but not browned, approximately 4-5 minutes. Add Rice and sauté. Rice will be come milky white, then turn clear. When clear in color, add the curry powder, salt and pepper, and the simmering coconut milk and broth. Give a couple of stirs with a spoon to incorporate ingredients. If the rice mixture doesn’t immediately come to a boil, bring to a low boil. Remove from heat. Cover and place casserole in a preheated 350 degree oven. Cook for 20 minutes. Remove from oven. If you are not using immediately, do not uncover and the pilaf will stay warm for half an hour or so.
*** I use Le Creuset enameled cast iron. This pot has to be able to withstand cooking on a stovetop, as well as in the oven.
Stir-Fried Baby Bok Choy
Serves 4
1 lb Baby Bok Choy
2 Teaspoons Sesame Oil
Salt
1 Teaspoon Baking Soda
Rinse and Drain Baby Bok Choy. Heat a large pot of water to boiling. Shower in baking soda (this will brighten the greens). Add Bok Choy and cook for one minute. Drain. Spray with cold water to stop the cooking process.
Heat a wok, then add sesame oil. Heat just for a couple of minutes until hot, but not smoking. Toss in Bok Choy. Stir-fry for a minute or two. Add salt to taste.
*** Note: These were very tiny baby bok choy. If you had more mature greens, you would need to increase the cooking time in the wok.
Monday, January 11, 2010
Expiration dates!
OMG, Oct 1990! I thought I would add some water chestnuts to my Thai Veggie Wraps this evening. Thankfully, I checked the expiration date on the can. I had no idea I had these things for that long--how embarassing! Clean out your pantry everyone!
Sunday, January 10, 2010
Dinner Tonight: Potato, Onion, and Fresh Herb Fritatta
Late dinner tonight because of a late Sunday lunch today. DH was up all night last night delivering babies, so we chose to eat our main meal early today. But, after watching "Chef Academy" this evening, I suddenly became incredibly hungry. Lots of stuff in the fridge, but not enough energy to do something with much preparation. Choices were pasta with marinara or a fritatta. We chose the fritatta, a delicious recipe from "Marcella Cucina" that includes very thinly-sliced potatoes with the eggs, sort of an open-faced omelet. I served it with a very simple frisee salad. Tasty and satisfying!

Saute potatoes and onions.

Add eggs.

Finished product!

Saute potatoes and onions.

Add eggs.

Finished product!
Saturday, January 9, 2010
What's for Dinner?
So, if I'm going to do this blog, I need to include some recipes. In honor of an absolutely frigid, wintry day here in the South, I'm cooking Vegetarian Black Bean Chili. This is a recipe I found years ago in The New Basics Cookbook, by Julee Rosso and Sheila Lukins. I alter here and there to suit what's available in the market, but this chili recipe is as good as it gets. Paired with my own version of Southern Cornbread, this is a yummy and nutritious meal.
Black Bean Vegetable Chili Recipe
1 eggplant, cut into 1/2 inch cubes
1 T coarse kosher salt (I use table salt)
1/4 cup olive oil (I try to use half of this amount)
1 onion, cut into 1/2 inch dice
2 zucchini, cut into 1/4 inch dice
1 red bell pepper, cored, seeded and cut into 1/4 inch dice
1 yellow bell pepper, cored, seeded and cut into 1/4 inch dice
4 large cloves garlic, coarsely chopped
8 ripe plum tomatoes, cut into 1 inch cubes
1 C vegetable broth
1 C chopped fresh Italian parsley
1/2 C slivered fresh basil leaves
3 T chili powder
1 1/2 T ground cumin
1 T dried oregano
1 tsp. freshly ground black pepper
1/2 tsp. dried red pepper flakes
Salt to taste
2 C cooked black beans (I use 2 cans)
1 1/2 C fresh or frozen (thawed) corn kernels (2-3 cobs)
1/2 C chopped fresh dill
1/4 C lemon juice
Sour cream, for garnish if desired
Grated Monterey Jack cheese, for garnish if desired
3 scallions, thinly sliced for garnish if desired
1.Place the egglant in a colander. Toss with salt and let sit for one hour to remove the moisture. Pat dry with paper towels.
2.Heat half the oil in a dutch oven (large pot). Add onions, zucchini, bell peppers and garlic. Saute over medium-low heat for about 10 minutes.
3.Place the remaining oil in a skilled and cook the eggplant over medium-high heat until just tender, about 10 minutes. Transfer the eggplant to the dutch oven.
4.Add tomatoes, broth, 1/2 cup of parsley, basil and spices to the pot. Cook over low heat for 30 minutes, stirring occasionally.
5.Add the black beans, corn, dill and lemon juice. Cook another 15 minutes. Adjust the seasonings and stir in the remaining 1/2 cup parsley.
6.Serve hot, garnished with a dollop of sour cream, grated cheese and scallions.
Makes 8 portions (Recipe from the New Basics Cookbook).
Southern Cornbread This is Southern Cornbread, so there is no sugar.
Preheat oven to 450 degrees
2 Cups Stoneground cornmeal (I like medium grind)
1 teaspoon salt
2 teaspoons Baking Powder (double acting)
1/4 teaspoon Baking Soda
2 large eggs
3 Tablespoons canola oil (I know this is blasphemy-no butter or bacon fat)
1 1/4 to 1 1/3 Cups Buttermilk
Mix dry ingredients. Lightly beat eggs with a fork. Heat oil in an 8" iron skillet, until sizzling hot, but not smoking. Incorporate eggs in the dry mix, then add buttermilk. Don't overmix batter, but there shouldn't be any lumps of dry cornmeal. The batter should be neither too thick nor too thin, perhaps the consistency of pancake batter. It is important to complete the batter shortly before adding to the hot pan. Add 1 tablespoon of the hot oil to the batter, mix in, then put batter into the hot skillet. Batter should sizzle, ensuring a proper crust. Immediately place into preheated oven. Cook 15-18 minutes, or until nicely browned. Turn onto plate, cut into wedges and serve immediately.
Starting the New Year Right!
It's a couple of weeks into 2010, and I thought I would begin a journal about my goals for the New Year. It's simple: I want to lose 10 lbs, I want to begin bicycling again, but most importantly, I want to become the best vegetarian cook I can be.
A little history: I have been happily married to the same man for 31 years, 7 months and have two college-aged children. I am a hopeless animal lover, currently with four furry friends as my constant companions: Zoe, my 13 y/o, mostly-blind, diabetic "Ms. Barky Von Schnauzer", Puck, my rescue pup--just a big old black dog, "King" George, the adolescent white cat who truly rules the household, and Little Ginger, the rescue bob-tail kitty who contentedly resides at the bottom of the pack.
Over the past 18 months, I have lost 85 lbs and have reached my "official" WW goal, 10 additional pounds and I'll be very happy. I began bicycling (again) a couple of years ago, but last September 1, I had a serious cycling accident resulting in three lower leg fractures and a severe syndesmotic ligament rupture in my ankle. I'm probably close to 90% with my recovery and I hope to get back on the bike soon.
I had always been an accomplished cook, and a true foodie learning the skills as many have from Julia Child and Marcella Hazan. Since I became a vegetarian several years ago, my cooking skills just don't seem to be what they used to be. I have had to totally re-create, re-think, and relearn just about everything related to cooking. Even though I don't eat meat (except an occasional oyster, and I don't think they count as sentient beings), I still consider myself a foodie. My goal this year is hone my cooking skills, becoming the best and most creative vegetarian chef I can be.
Subscribe to:
Posts (Atom)